
Icon Tools
Last updated on 2 months ago
miker1264Software Dev
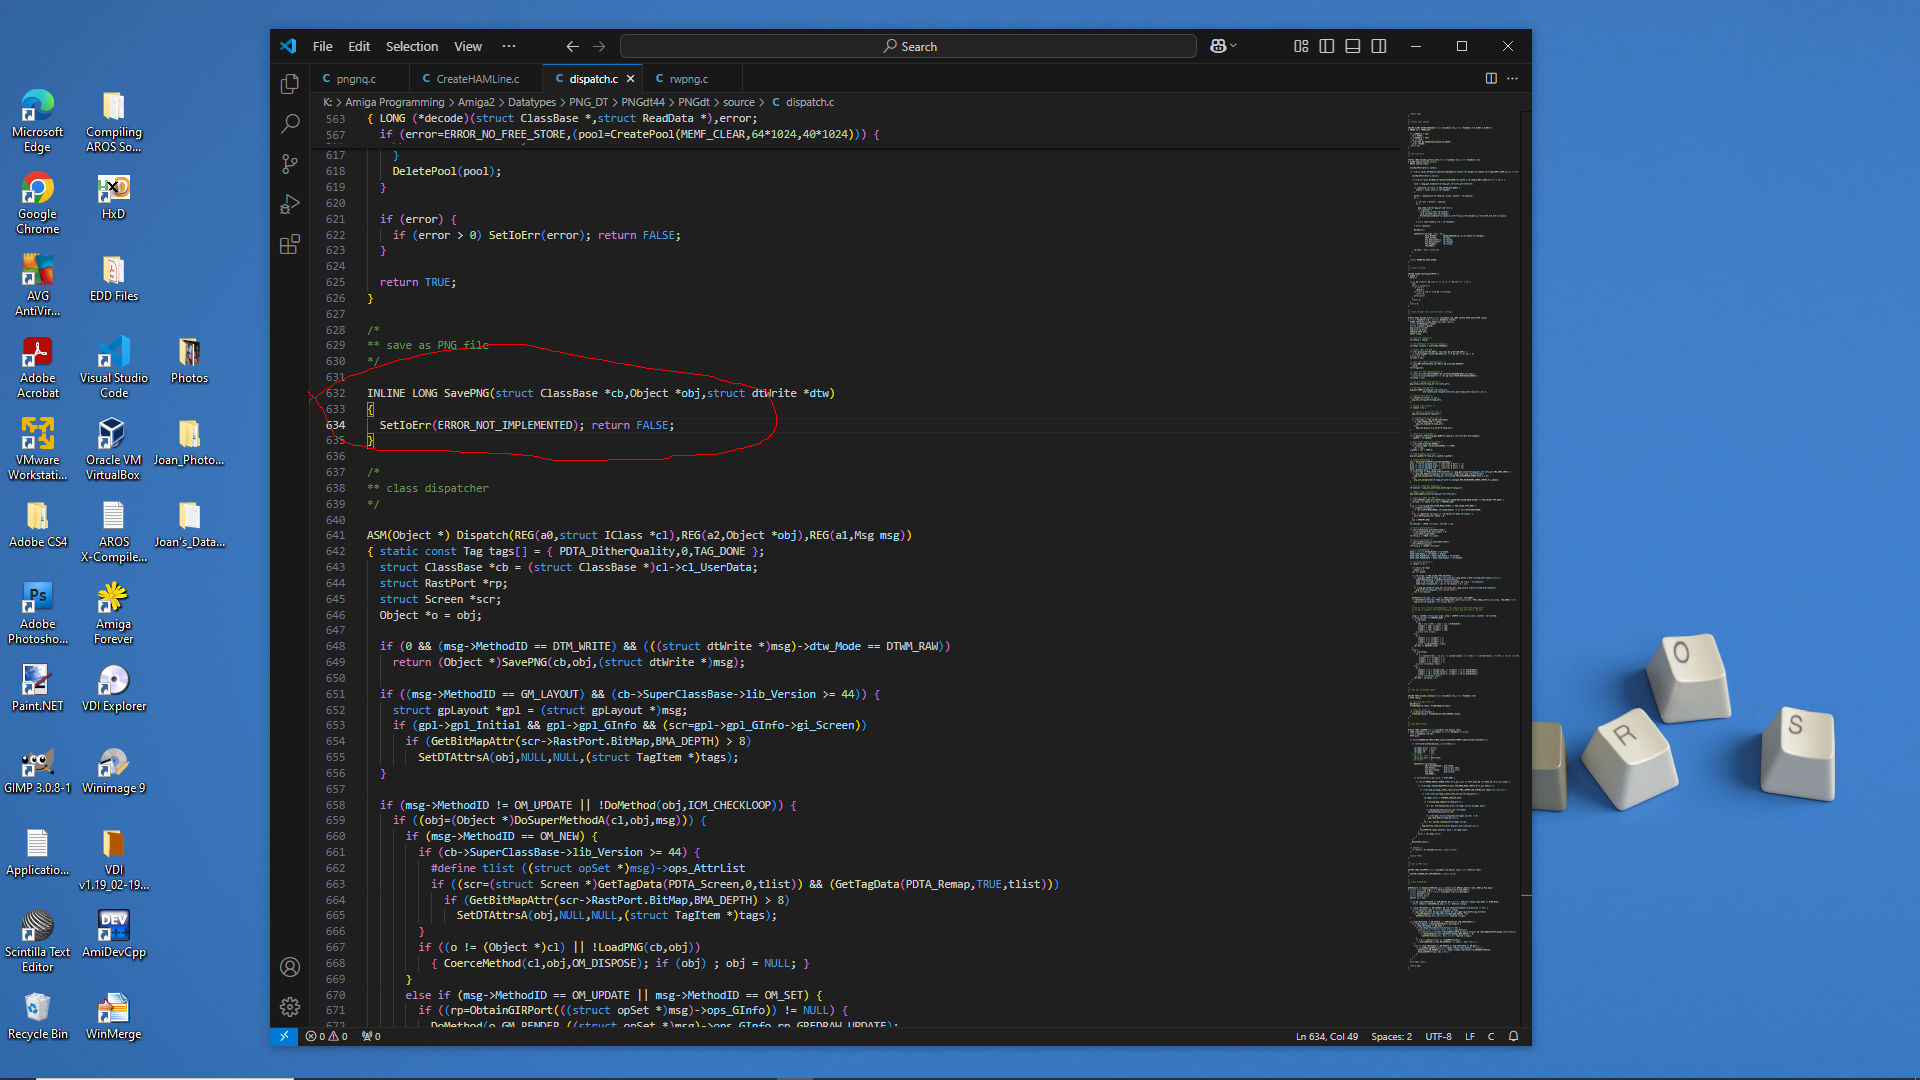
Posted 2 months agoNow I know why the OS 3.9 PNG datatype only Saves as ILBM.
See the screenshot...
SavePNG is Not Implemented.
At a later time I will setup Amiga-gcc cross compiler and try to fix the datatype by adding a save function.
In the meantime I can use rwpng.c provided with png_nq for Amiga which is part of PNG_Neuquant from libpng. It allows reading/writing PNG.
It seems ironic! For all the testing over the last week or two for using Datatypes to save a PNG image for the 68k version of Icon splitter, the Amiga Datatypes code works and now picture.datatype work but PNG datatype is incomplete to SavePNG.
So for icon Splitter I'll use rwpng instead till I have time to fix the PNG datatype. So much fun 😊
PS - I may need to install Bebbo's Amiga-gcc cross compiler for Amiga 68k to try to fix the Datatypes. It should be no different than compiling AROS 68k code.
Edited by miker1264 on 18-05-2026 15:08, 2 months ago
miker1264 attached the following image:
miker1264Software Dev
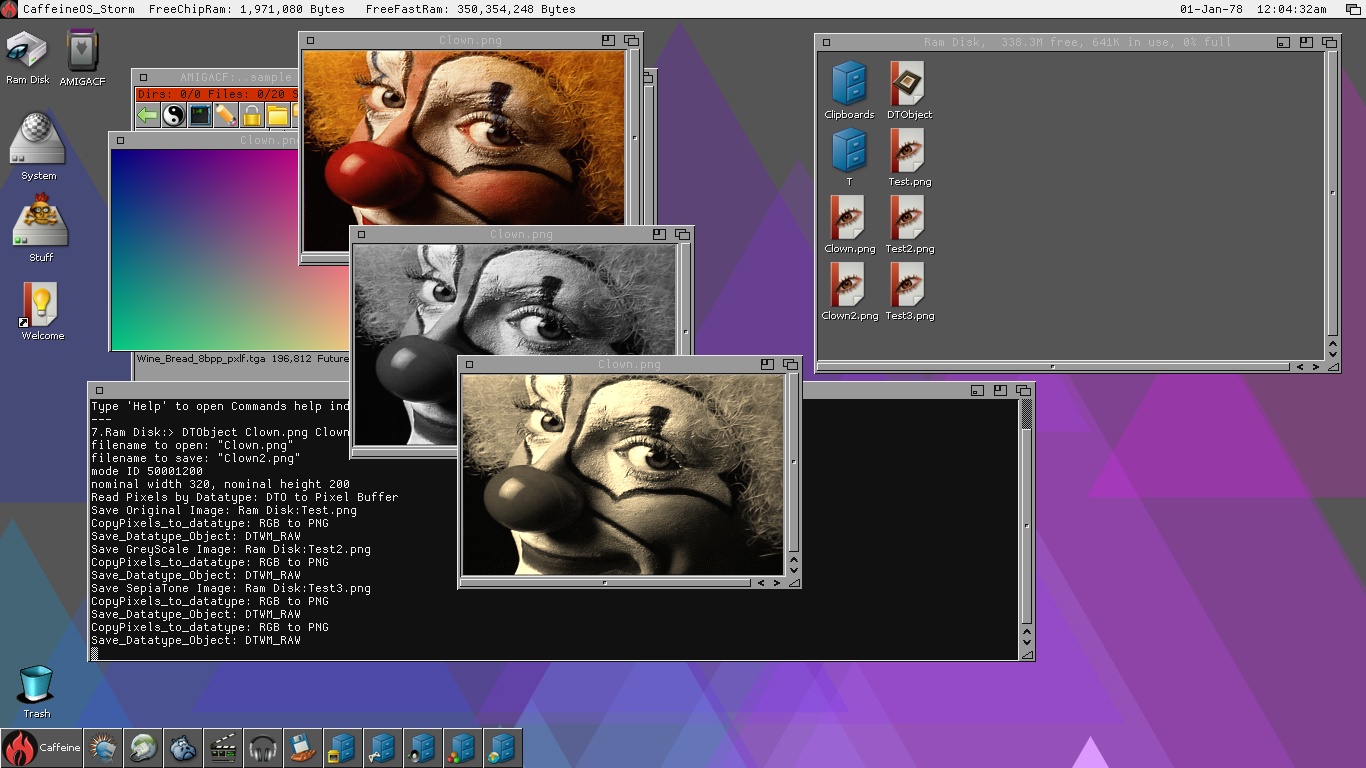
Posted 2 months agoSuccess!! It's a beautiful thing when the code works correctly. :-)
I had to get my Datatypes code to work correctly for Amiga 68k so I can update my Icon Splitter app for AROS 68k and Amiga. But I had some difficulty along the way over the past week or so. Nothing I did seemed to work as expected.
I narrowed it down then I discovered the problem. The picture.datatype that I was using for Amiga OS3.9 was corrupted. So I replaced it with the picture.datatype that comes with Picasso96. Then it worked perfectly!
The BMP datatype and PNG datatype still have issues though. These are the ones written by Gunther Nikl many years ago. The save functions for those Datatypes aren't working. BMP doesn't save anything and PNG datatype saves ILBM instead of PNG. I have the source code for both Datatypes to look at to see why this happens.
In the meantime I have a program that uses PNG library to read and write PNG files directly. So I can use that and I can use native Read BMP and Write BMP in my application. The Targa Datatype may be working. And far as I can see JPEG works.
I attached a screenshot of my AROS Datatypes code and my GreyScale and SepiaTone functions from PixieView working on Amiga 68k.
I'm using AddDTObject to add it to the window to display the images. This is the method AROS MultiView uses. It also allows PDTM_Scale to resize the datatype image data so you resize the image using a window size gadget. That's a nice feature!
Now I can move forward to port PixieView to AROS 68k and Amiga.
2 users reacted to this post
retrofaza, Deremon
miker1264 attached the following image:
miker1264Software Dev
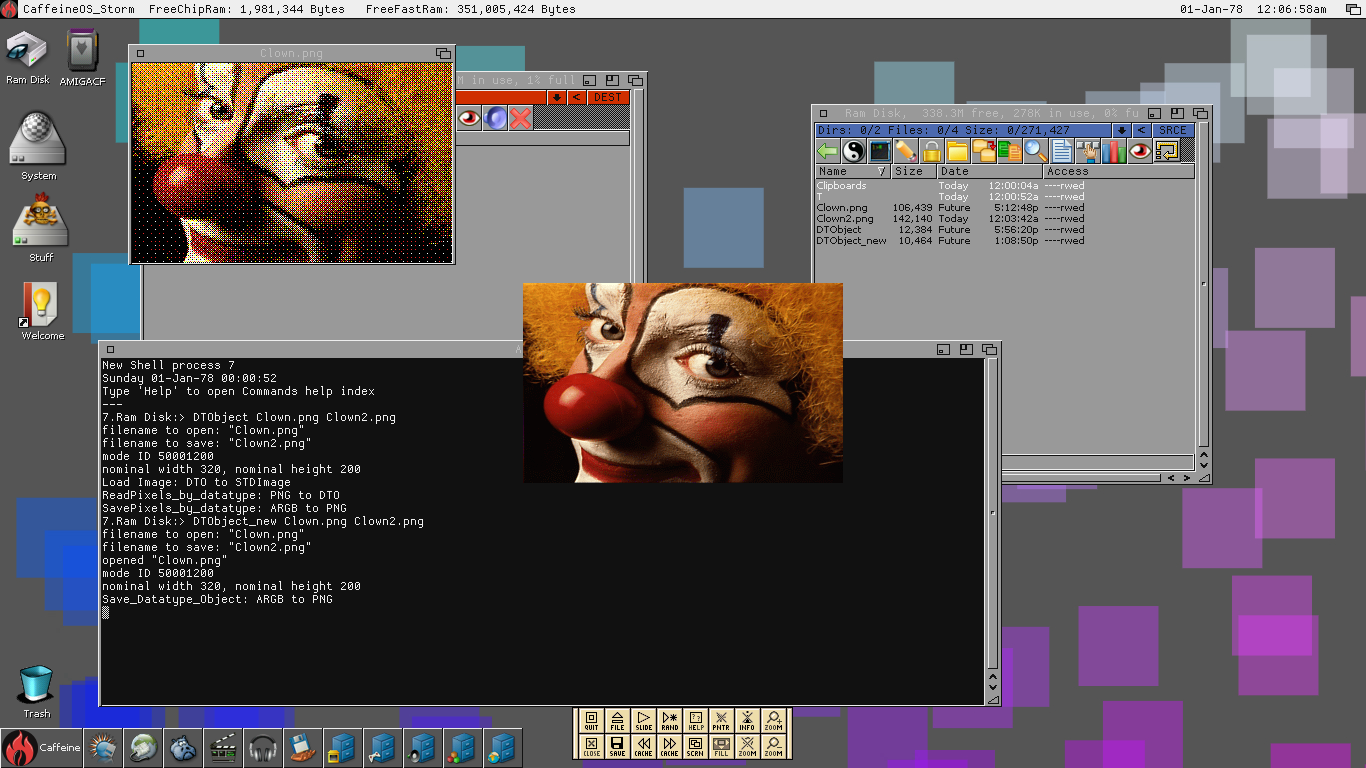
Posted 2 months agoThere must be something wrong with the Datatypes system on Amiga OS 3.9. When I get a datatype object of a PNG image then save it directly using DTM_RAW it saves correctly. When I use PDTM_ReadPixelArray to get pixel data it is corrupted.
When I modify a pixel buffer with a gradient test image then copy to the same datatype object using the PDTM_WritePixelArray it seems ok. But when I save it afterwards with DTM_RAW it should save a PNG. But for some reason it saves as ILBM.
Is there something wrong with the picture.datatype? The same code works on AROS but not OS 3.9 !!
miker1264Software Dev
Posted 2 months agoI added more Datatypes functions to the DTObject test program getting ready to update Icon Split for Amiga 68k & AROS 68k. At the moment it saves ARGB image data as TARGA instead of using Datatypes to save as PNG. There will also be some internal updates to bring it up to the current code of Icon Split for AROS 32bit. Then after the updates I'll try to compile the code for AROS 64bit.
Although the Datatypes code for the DTObject test program is working the display method isn't doing well. The image is remapped and dithered which is not the desired effect.
At a later date I'll continue to find a solution for displaying 24bit/32bit images on RTG screens on Amiga. I suspect I'll need to open a custom screen whose depth and dimensions match the image to be displayed. The window dimensions match the screen exactly and it uses the custom RTG screen that was opened already. When it's time to display the image move the screen to the front over the workbench screen then use BltBitMapRastPort to draw it in the rasterport. That should work well.
miker1264 attached the following image:
miker1264Software Dev
Posted 2 months agoI've successfully setup a new 4GB CF card for testing! It at first showed up as CF0:Nondos so I had to do a quick fat95 format then it worked.
But my Picasso96 code didn't work. There are other drawing methods. I'll keep trying till something works. :-)
I will make frequent backups of the test data on my CF Card going forward. I don't want to lose any valuable source code!
But my Picasso96 code didn't work. There are other drawing methods. I'll keep trying till something works. :-)
I will make frequent backups of the test data on my CF Card going forward. I don't want to lose any valuable source code!
Edited by miker1264 on 09-05-2026 14:55, 2 months ago
miker1264Software Dev
Posted 3 months agoThe last few days have been frustrating, challenging and rewarding all at the same time!
I'm trying to update my Icon Splitter for Amiga OS 3.x but I have had several issues on the Amiga side.
In addition to trying to get the picture Datatypes to work correctly I was also trying to find an accurate method to draw RGB & ARGB images to the RTG rasterport of Caffeine OS which is Amiga OS 3.9 but it didn't go well at first. Adding a datatype to the window used dithering which caused the image to look terrible. Maybe the original AGA chipset and libraries only supported up to 8bit bitmaps? I'm not sure.
Then I did more research and I realized I had two main options -Cybergraphx or Picasso96. As far as the first option I'm used to using WritePixelArray & WritePixelArray alpha on AROS with Cybergraphx. But Caffeine OS uses Picasso96 & the two RTG solutions don't play well together on the same system.
Then doing more research I discovered I can use p96WritePixelArray for drawing purposes & that since early versions Picasso96 offered a framework to intercept Cybergraphx function calls to use its own functions instead. So it's Cybergraphx code on Picasso96. I was just about to test that when the 2GB CF Card I was using to transfer Program data, test images & test icons to and from my A1200 took a dump! I lost most of my data.
However, I'm trying to reconstitute the data on another CF Card for testing. I hesitate to use HD floppy disk to transfer data. It's such a pain! The good news is my Picasso96 code to draw to the RTG screen did finally compile correctly. But does it work? That's the question!!
Edited by miker1264 on 09-05-2026 11:55, 3 months ago
miker1264Software Dev
Posted 3 months agoThe main difference between the AROS version of Icon Splitter and the Amiga version is that Amiga 68k requires that all the necessary libraries be opened at the start of the program and then closed at the end. AROS opens libraries as needed.
miker1264Software Dev
Posted 3 months agoAs for the Icon Splitter for AROS I made a few internal changes, updated the version number and I added a new Datatypes function to split an OS4 ARGB Icon to save it as PNG images. Previously I was saving directly to TARGA format because that was easier for Amiga 68k. At that time I was having an issues trying to figure out proper usage of Datatypes for Amiga.
The AROS version has been corrected. In order to fix the Amiga version I setup a small application called DTObject (Datatype Object) to test Datatypes on Amiga 68k. It's working as expected. More testing required though. :-)
For Icon Splitter for Amiga 68k I'm using a newer version of Peter K's Icon Library. I use ICON CONTROL to get the pixel data from the OS4 icon's ARGB chunks. Then save to TARGA file but it should be PNG.
Edited by miker1264 on 04-05-2026 13:33, 3 months ago
1 user reacted to this post
retrofaza
miker1264Software Dev
Posted 3 months agoIt's not an icon tool exactly per the title of this thread, but in the past I started a test project that I haven't finished.
I modified Icon Library to use "Icon Alias" which substitutes the images of the currently displayed icons based on an alternate set of icons.
Like I mentioned I modified Icon Library to use alternate icons. I proved that it is possible because I was able to substitute the images based on an "Icons list" text file.
Like when we use alternate Window Themes there's a text file that indicates which theme to use. There will be a text file indicating to Icon Library which alternate icons to use.
If the icon alias text file is present then icon alias is active. Icon Library will substitute icon images of the current icons if the icon names match the names on the icons list.
For example, if the current icon is "System" and icon alias is active then Icon Library will read the icons list in the specified in the text file. If it finds "System" in the list it will substitute the icon images for the images in the alternate icon. If the icon name is not on the list, Icon Library displays the current icon as usual then goes to the next icon, etc. When the prefs text file is not present then icons display as usual.
It's an easy way to display "Icon Themes" to accompany "Window Themes" without physically changing your entire icon set. If we don't already have 'icon prefs' it might be useful as well for settings.
I believe Icon Alias deserves another look to see If I can make it work! Actually , I should rephrase that. It WORKS but now I need to clean it up and streamline & formalize it. :-)
Edited by miker1264 on 10-04-2026 16:54, 3 months ago
deadwoodAROS Dev
Posted 4 months ago@miker1264
Great to see you are speeding up your work with using Copilot. The advantage that is frees you from searching documentation and gives you condensed answer is really a time saver. I opened a specific thread on using AI for AROS developments - if you have any hints or suggestions for other developers how to use AI, please consider posting there
Great to see you are speeding up your work with using Copilot. The advantage that is frees you from searching documentation and gives you condensed answer is really a time saver. I opened a specific thread on using AI for AROS developments - if you have any hints or suggestions for other developers how to use AI, please consider posting there
1 user reacted to this post
miker1264
miker1264Software Dev
Posted 4 months agoI have used Copilot AI recently, mostly for research to help understand certain concepts. It also provides useful code examples that actually work when included in my application and when compiled. I used it for gaussian blur research.
It does speed up the development process because I don't need to search the AROS programming database or OS4 documentation for programming. I just ask specific questions to get specific answers.
I hadn't heard of Vibe Coding before. I'll look into that. Anything that speeds up the coding process whether it is assistance with research concepts or actual code examples is a bonus! It's beneficial.
Edited by miker1264 on 06-04-2026 15:11, 4 months ago
Vibe / AI can help a lot improving the productivity, but I recommend it only to experienced people.
The most important thing for a developer is to exercise, practice, and develop a good mindset and knowledge-base.
After that, a bot can multiply the productivity.
The most important thing for a developer is to exercise, practice, and develop a good mindset and knowledge-base.
After that, a bot can multiply the productivity.
Edited by cdimauro on 06-04-2026 13:28, 4 months ago
miker1264Software Dev
Posted 4 months agoThe only issue with AROS programming is that it takes soooo long to develop source code that does anything useful. It's very time consuming and people just aren't willing to commit themselves to it.
It may take several months or even years to develop useful source code. One advantage would be to produce source code that can be re-used for other programs or system files. That's where I am now with my projects. Much of the code can be re-used to be included in new apps.
Although my programming skills are improving there are some things I still need to learn. My annotation in my source code has improved. Now I add notations and cleanup code and fix indentation as I go. I used to wait till the end, but that never gets done! It's too much to do at the end.
There are several things I need to learn to get better at programming. I have to get much better at using GitHub. I need to gain experience writing device drivers whether for sound or graphics or peripherals such as USB or Serial connections. I also need experience writing or updating system libraries. Picture Datatypes, in a sense, are simplified libraries so I have a good start there.
Hint: there is a UART driver for AOS4 that I'm looking at. I'd like to implement something like "Waffle Reader" for AROS using USB-Serial with Poseidon USB implementation.
1 user reacted to this post
cdimauro
AROS would have achieved all the goals it’s been dragging its feet on for years long ago if the ‘junior’ staff had been able to do all this.
Thank you for your valuable work!
Thank you for your valuable work!
miker1264Software Dev
Posted 4 months agocdimauro,
Thanks for the programming information. I still consider myself a junior programmer in some respects although I'm getting better.
At first I just wanted to get the application working to post it and share it here. I'll update it with the ideas and information you provided.
To be honest, I don't understand some of the terminology such as mantissa, although I can look at the code to improve it as you suggested as far as the variable types, etc.
I had intended to spend the next two weeks trying to tweak and improve the addshadow application to allow it to produce images with borders that are closer to the original. I'll incorporate some of the things you mentioned at the same time. I'll also be working on the addglow application as addshadow and addglow are similar in construction but slightly different as far as code.
For example addshadow uses the input image to construct a shadow mask composed of black pixels with a transparent background. But addglow uses the input image to build a colored Glow mask. It also applies post processing to adjust Saturation and Luminance.
Edited by miker1264 on 05-04-2026 13:14, 4 months ago
I've not enough time to check all source. I share some quick comments.
Any reason for using both int and long?
Is long supposed to be 64-bit (I don't recall AROS's ABI for 64-bit system)? If yes, then better to use int instead of long where applicabile (for example, you used long for Width and Height, but you use int for Ctrl_X and Ctrl_Y which should similar size).
Try to better align big array structures where you make iterations. IconImage.ImageData, for example, has an odd width (143) which results in rows not being (at least) 16 bytes-aligned (SIMD architectures have at least 128-bit -> 16 bytes registers, but 256-bit are common, and 512-bit are spreading around). Compilers can vectorize code to make the loops executions much more efficient, IF they can recognize proper alignments.
Another example is ChainCode.Code which is oddly aligned by itself (e.g.: 3 32-bit values defined before it).
You can also give the proper type to some data elements and shuffle them to properly pack, saving space. IconImage.Depth could be unsigned char, and NumColors an unsigned short, so that they could take 32-bit space in total (counting the implicit padding used by compilers to align the next field in the structure, which is at least 32-bit). Transparency could be moved to after them to "complete" this sequence of fields (all together they will take 16 bytes at least, beforeImageData).
RGB is a duplicate of IconPalette.
In general, you might consider the usage of single instead of double for colours manipulation: it takes much less space, should be much faster on SIMD architectures (doubling the number of executions) and its precision should be enough to handle all transformations (colours use 8-bit of precision and single has a 23 bit mantissa: a good match).
You can also define a typedef for the type, so that you can easily change it in future (e.g.: half float precision might also be a good fit. But it needs some experiments to see if its mantissa could be enough).
miker1264Software Dev
Posted 4 months agoHere is the cli application "addshadow" which adds a shadow border to the first icon image. The first image must have the background removed (transparent) by making all background pixels black (0,0,0) with alpha also set to zero.
The syntax for the program is:
addshadow OldImage1_Tile.png Composite_4.png which will generate a shadow mask and combine it with the image tile to produce the finished output image.
Composite _4.png is the output image. OldImage1_Tile.png is the input tile image with no background.
The syntax for the program is:
addshadow OldImage1_Tile.png Composite_4.png which will generate a shadow mask and combine it with the image tile to produce the finished output image.
Composite _4.png is the output image. OldImage1_Tile.png is the input tile image with no background.
Edited by miker1264 on 04-04-2026 21:07, 4 months ago
miker1264 attached the following file:
addshadow_release_04-04-26.zip [25.78kB / 133 Downloads]
miker1264Software Dev
Posted 4 months ago@cdimauro - If you abstract enough the functions, you can create a library for general image effects, that other programs then can use.
Yes. I spent the last two weeks making the functions abstract and portable so they can be used by other programs.
It uses two IconImage structs im1 & im2 as containers to hold width, height, depth and argb pixel data. The im1 struct contains the icon image with the background removed. The im2 struct at first contains a copy of im1 but it holds the shadow mask or the glow mask. At the end the image in im1 and the mask in im2 are combined.
Edited by miker1264 on 04-04-2026 19:42, 4 months ago
1 user reacted to this post
cdimauro
If you abstract enough the functions, you can create a library for general image effects, that other programs then can use.
You can view all discussion threads in this forum.
You cannot start a new discussion thread in this forum.
You cannot reply in this discussion thread.
You cannot start on a poll in this forum.
You cannot upload attachments in this forum.
You can download attachments in this forum.
You cannot start a new discussion thread in this forum.
You cannot reply in this discussion thread.
You cannot start on a poll in this forum.
You cannot upload attachments in this forum.
You can download attachments in this forum.
Moderator: Administrator, Moderators